Welcome to the 6th edition of Scale with Outbound. (if you want to follow my new case studies, you can follow me on LinkedIn).
👋 Warm welcome to the new joiners!
In this newsletter, you will :
Discover how I help my clients reach out to their target customers to book more qualified meetings and generate revenue.
Access my document, processes, experiments, learnings, and failures.
👉 Grab my lead gen automation templates here.
I'm sharing my learning here with you.
Summary :
Scope of the post
Email deliverability
Toolbox
Scope of the post :
This post is about all the steps needed to land in your lead inbox.
There is plenty of documentation on the internet made by experts on the topic.
I’m not one of those, but I needed to implement the following steps for myself, so I’m providing my process here.
Let’s go!
You can access my previous articles about audience understanding and lead preparation if you have missed them.
Email deliverability:
Email deliverability is the ability of an email message to arrive in the recipient’s primary email inbox.
Email deliverability is often measured as a percentage of emails accepted by the internet service provider (or ISP for short). 1
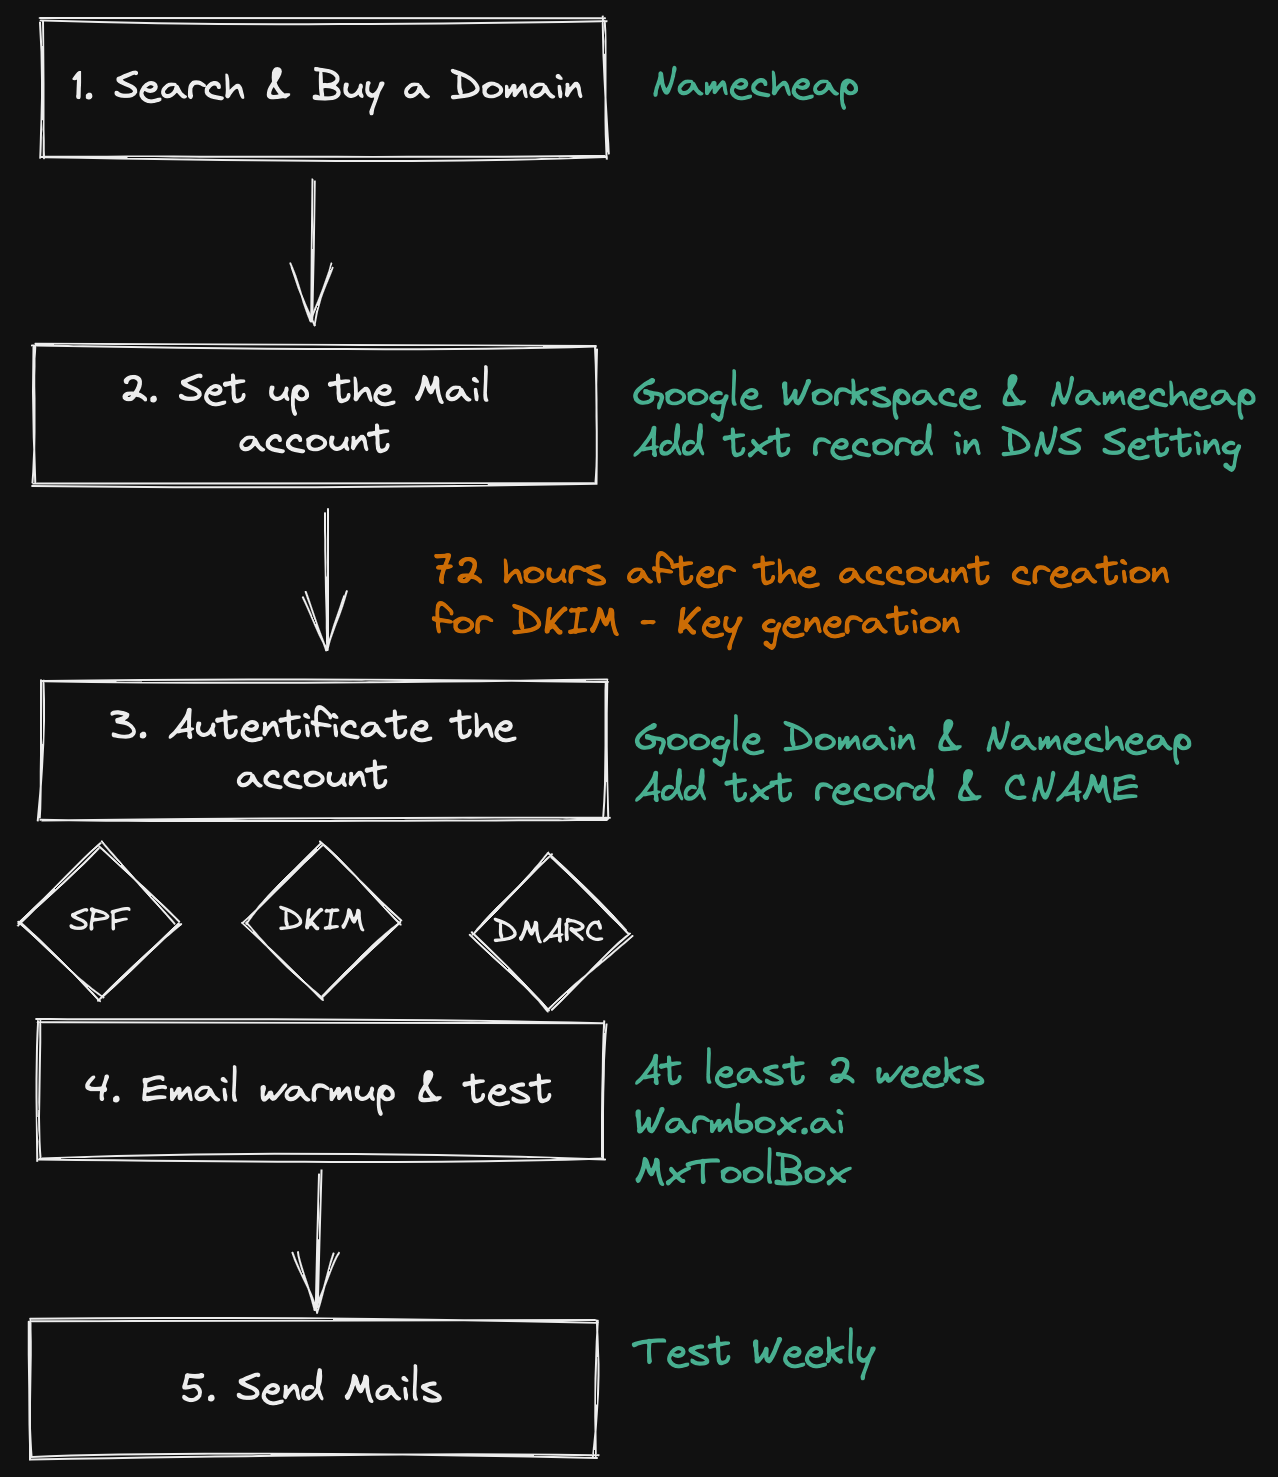
I’ve created this workflow to help you navigate through the process:
The main goal is to avoid contact confusion.
So, you can purchase a domain close to your primary domain name.
Example: Imagine the primary domain is arnaud.fischer@growth-catalyst.com , you can use arnaud.fischer@growthcatalyst.ia
Once you have purchased the domain, you need to link your domain to your email provider.
This video explains how to link your new domain to your SMTP provider.
Usually, it will take 72 hours for the activation.
Once the account is activated, you have to configure the authentication parameter.
Sounds a bit technical, but from a global perspective, you can imagine that as the identity card of your domain.
All you need to do is to copy/paste the key and text snippet from your DNS setting to your ISP parameters.
There are three essential parameters:
✅ SPF: Stands for Sender Policy Framework, an email authentication method designed to prevent email spoofing by verifying the sender's IP address.
The principle of SPF is to allow domain owners to specify which IP addresses are authorized to send emails on behalf of their domain.
When an email is received, the recipient's email service provider can check the SPF record to confirm that the email came from an authorized source.
✅DKIM: Stands for DomainKeys Identified Mail, which is an email authentication method that uses cryptographic signatures to verify that an authorized sender sent an email and that the email's content has not been modified in transit.
✅ DMARC: ✅SPF + ✅DKIM
Stands for Domain-based Message Authentication, Reporting, and Conformance, which is an email authentication protocol that helps domain owners protect their domain from fraudulent email activity by providing a mechanism to enforce SPF and DKIM policies and receive feedback on email messages sent from their domain
Bravo!
Your domain and email address are ready to go.
Now, I recommend using an Email warmer to gradually ramp up your email sending volume to avoid triggering spam filters and improve your email deliverability.
An email warmer can help establish a positive sender reputation and increase the likelihood that your emails will be delivered to your subscribers' inboxes.
Usually, I set it to 3 weeks and progressively increase the number of emails sent daily.
Ready to go - Now, all you have to do is to monitor your sender reputation.
Toolbox:
Here is a list of tools I’m using:
1- Purchase a domain: Namecheap
2- Email warming with warmbox
3- SPF, DKIM, DMARC tester with google toolbox
4- Email spam test with mail-tester.
As usual, ping me on Linkedin if you have any questions.
See you next week
Arnaud
https://www.activecampaign.com/glossary/email-deliverability


